Monday, January 9, 2012

Monday Make It....{Re}Purposed Binder

This weeks Monday Challenge is to re-purpose an item that was headed to the trash or recyle bin. 

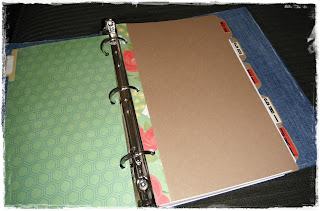
I had a small binder I was going to throw away.  It was sticky and had scribbled pen marks on it.  I decided to turn it into an address book.  Ideally I would love all my phone numbers and addresses to be stored in my cellphone...but that always ends up biting me in the you know where.  They never seem to transfer to a new phone...and I end up having to start over.  Solution: a permanent copy for our kitchen bookshelf.

originally was going to make a calendar...went a different way instead
First you need to cut apart your binder.  This is actually pretty easy to do using an exacto knife or a pair of scissors. 

slice on the seams
Next get to strippin'.  The binder!  Take all the plastic off the binder pieces.  Trickiest part is under the binder clips...use an exacto knife to slide in there and slice from the fastener to the edge.  You should be able to tear the piece off now.

Nekkid as my friend Fairymo would say.
 I have a favorite pair of jeans that had holes in the knees.  I turned them into shorts and saved the legs.  This is what I wanted to use to cover my binder.  Enter Modge Podge (cuz I can't sew very well).  ***To add a little structure to the seams I first adhered the three pieces to a piece of cardstock. (Just at the spine and part of the front and back cover). 


Cut straight much???
I covered the insides with pieces of jean too...in hind sight I should have used the clean cut fabric interfacing and my silhouette for a nicer edge...oh well...live and learn.
Ta da........love it!  Had to include the tear that came with the jeans because those tears are expensive!
That hole added about 10 bucks to the cost of these jeans.


Rest of the book was finished with some For the Record papers and cardstock stickers by Echo Park.  Dividers are a Silhouette download that I resized for my needs.  I also included a page at the very beginning for web addresses too.  Easy Peasy.  Gonna be tearing off the ugly plastic covers on all my binders now!

web addresses page
cardstock dividers reinforced with pretty paper.
Thanks for looking...leave a link in the comments if you have a repurposed item to share.


Thursday, January 5, 2012

Need to Learn Your ABCs?? It's In The Bag!

I made a New Years Resolution to blog more.  Since this is a craft blog, that means crafting more too.  Pretty excited that I actually have a second project done and it is only January 5th!  Go, me!!
I had a hankering to make a paper bag album.  I love the crunchy noise they make.  But what to make it for or use it for or put in it???  I was doing some Kindergarten prep with Jake and decided an alphabet book would be an awesome project.  Josh could use it too.  And they would both enjoy the crunchy noise it makes when you turn the pages.
So here it is....and ABC Book.
First I folded the bags in half and creased the fold with a bone knife.  I opted to not stack them inside each other as I need to use several to fit the whole alphabet.  I didn't want that waterfall like edge from using too many.

To cover the pages I used several different sheets from various October Afternoon Collections....Fly a Kite, Seaside, Daydream, 5 & Dime, Sidewalks, Schoolhouse and a shape sticker sheet from the Report Card Collection.

lots of crunchy goodness


wrong haircolor but so reminds me of my boys when they read
I have three boys.  They are a serious demolition crew...so I went with a worn and torn look.  Each 5 x 5 sheet I cut was distressed on the edges and then crumpled up and re-flattened.  Fun.
For the letters I used some Core'dinations cardstock and my Silhouette.  I sanded the letters and adhered them in the book.
oh..Lean Cuisine is on sale and I have coupons!

I had bigger visions for this album...pull out tags since the bag has a premade pocket...but then realized a 2 and 5 year old would be using it and kept it simple.  Pretty excited with the outcome.  It looks really cool.
Used my Cinch to punch holes in it but decided on two binder rings to hold it all together.


I foresee more of these albums being made.  Maybe a number one.


This was a true Scrap-ements projects.  Fifteen minutes here, fifteen minutes there over the course of two days.
Thanks for looking!

Monday, January 2, 2012

Monday Make It Challenge


I am challenging my scrappy friends on facebook and all my blog followers to a Monday Make It Challenge.
Make a notebook.  Alter an existing one....make one from scratch...whatever gets you motivated.
Here is mine with a quickie how to.  Pretty happy with the finished product.

Started with a pre-binded chunk of plain paper (had this in my "keep it and maybe I'll use it" pile), a few sheets of Quite Contrary Paper from MME (love this paper as I have a bit of an owl obsession happening), really nice fabric (donated to me by my awesome friend Sharon M.), a 12 x 12 piece of black chipboard and some fabric interfacing for the Silhouette.

supplies...minus the various adhesives I used
First I did some measuring so see how much I would need to cut off so that the paper would fit nicely in the about to be chipboard cover.

measure twice, cut once or eyeball it and cross your fingers

It turned out to be the perfect width, so all I had to do was cut off some length and score it in the middle to create a spine.

be careful not to cut all the the way thru


 Then I covered the inside (minus the spine) and the outside (minus the spine).
hoot
love, love this paper almost hated to cut it
Now for the spine...I ironed the fabric to the Silhouette interfacing and stuck it on a cutting mat.  Then I took FOREVER picking just the right shape for the front side...downloaded a bunch of non-relevant shapes...organized the newly added shapes....  After all that I ended up with a pretty basic shape for the spine.  I am so good at getting side tracked.
stuff is awesome


should have ironed that crease....

12 hours later.......

awesome!

Adhering it to the spine was a fun challenge.  I had used up all my double-sided-super-sticky-adhesive.  So with a mixture of glue dots and Diamond glaze....I got that thing to stick!
All that was left was embellishing and sticking the bunch of paper on the inside (another challenge that involved a lot of different mediums).


binder clip to hold it shut...wish it was brown

inside pocket for....stuff

finished notebook!

cute little bookmark I made with leftover fabric, chipboard and an owl sticker.